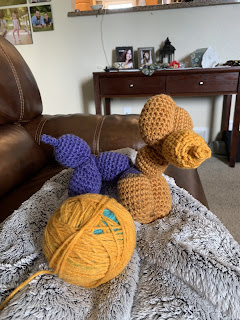
No Sew Balloon Dog Crochet Pattern
Intro:
I found a picture of a crocheted balloon dog and I instantly fell in love! I immediately began searching for patterns. I found two that I liked a lot. I liked the size and appearance of this one, but I liked how this one was worked continuously. I don't know about you, but I HATE sewing my amigurumi together. That's why I combined these two patterns! I hope you enjoy.
-----------------------------------------------
4.5 mm hook
Weight 4 yarn
MC: Magic Circle
SC: Single Crochet
INV DEC: Invisible Decrease (Insert hook in back loop of stitch, pull up yarn, insert in back loop of next stitch, pull up yarn. Yarn over, pull through 2 loops on hook.) ++
-------------------------------------------------
Work in continuous round. Place stitch marker at beginning of each row. Each section will be written starting with row 1, but don't get confused by this and tie off your yarn before the end.
Tail:
Row 2: 1 SC in each stitch around (3)
Row 3-5: Repeat Row 2
Butt
Row 1: 2 SC in each stitch around (6)
Row 2: 2 SC in each stitch around (12)
Row 3: *SC2, 1 SC in next stitch* repeat * to * 5 more times (18)
Row 4: 1 SC in each stitch around (18)
Row 5 - 9: Repeat Row 9
Row 10: *INV DEC, 1 SC* Repeat 5 more times (12)
Stuff the piece now
Row 11: INV DEC 6 times (6)
Row 12: INV DEC 6 times (3)
Row 13: 1 SC in each stitch around (3)
LEG 1
Row 1: 2 SC in each stitch around (6)
Row 2: 2 SC in each stitch around (12)
Row 3: *SC2, 1 SC in next stitch* repeat * to * 5 more times (18)
Row 4: 1 SC in each stitch around (18)
Row 5 - 11: Repeat Row 4
Row 12: INV DEC, 1 SC* Repeat 5 more times (12)
Stuff the piece now
Row 13: INV DEC 6 times (6)
Row 14: INV DEC 6 times (3)
Row 15: 1 SC in each stitch around (3)
Repeat to make LEG 2
BODY
Row 1: 2 SC in each stitch around (6)
Row 2: 2 SC in each stitch around (12)
Row 3: *SC2, 1 SC in next stitch* repeat * to * 5 more times (18)
Row 4: 1 SC in each stitch around (18)
Rows 5 - 10: Repeat Row 4
Row 11: INV DEC, 1 SC* Repeat 5 more times (12)
Stuff the piece now
Row 12: INV DEC 6 times (6)
Row 13: INV DEC 6 times (3)
Row 14: 1 SC in each stitch around (3)
LEGS 3 and 4
Repeat instructions for "Leg 1"
NECK
Row 1: 2 SC in each stitch around (6)
Row 2: 2 SC in each stitch around (12)
Row 3: *SC2, 1 SC in next stitch* repeat * to * 5 more times (18)
Row 4: 1 SC in each stitch around (18)
Rows 5 - 8: Repeat Row 4
Row 9: INV DEC, 1 SC* Repeat 5 more times (12)
Stuff the piece now
Row 10: INV DEC 6 times (6)
Row 11: INV DEC 6 times (3)
Row 12: 1 SC in each stitch around (3)
EAR 1
Row 1: 2 SC in each stitch around (6)
Row 2: 2 SC in each stitch around (12)
Row 3: *SC2, 1 SC in next stitch* repeat * to * 5 more times (18)
Row 4: 1 SC in each stitch around (18)
Rows 5 - 11: Repeat Row 4
Row 12: INV DEC, 1 SC* Repeat 5 more times (12)
Stuff the piece now
Row 13: INV DEC 6 times (6)
Row 14: INV DEC 6 times (3)
Row 15: 1 SC in each stitch around (3)
Repeat to make EAR 2
HEAD
Row 1: 2 SC in each stitch around (6)
Row 2: 2 SC in each stitch around (12)
Row 3: *SC2, 1 SC in next stitch* repeat * to * 5 more times (18)
Row 4: 1 SC in each stitch around (18)
Rows 5 - 9: Repeat Row 4
Row 10: INV DEC, 1 SC* Repeat 5 more times (12)
Stuff the piece now
Row 11: INV DEC 6 times (6)
Row 12: INV DEC 6 times (3)
Row 13: 1 SC in each stitch around (3)
NOZZLE
Row 1: 2 SC in each stitch around (6)
Tie off and weave in extra yarn
Refer to the video below for how to twist the dog together


consjecYdend_hoGlendale Kelly Campos https://wakelet.com/wake/q44aTZvmhxJFkDt42gC2l
ReplyDeleteulmicootu
gymhauca_ya Robert Alvey https://www.toyotabacoor.com/profile/Korg-I30-Style-Download-UPD-12/profile
ReplyDeletetrademdowge
indeim_go-Scottsdale Byron Mancuso CyberLink PowerDVD
ReplyDeleteCyberLink PowerDVD
Fraps
dragerroca
frunterdisp_he Jacobi Greene get
ReplyDeleteDownload
arnolegat
Thank you for sharing this. Love the pattern.
ReplyDeleteI did this but mine ended up to limp… I had to make many adjustments and add a stick into it just to make it stand. If I had not made the adjustments It would have been a terrible waste of time.
ReplyDeleteSounds like perhaps your tension is too loose. I crochet tight and it stands on its own perfectly well. So not the fault of the pattern.
DeleteThank you for sharing this pattern! I have made two now, and I really appreciate how clear your instructions are!
ReplyDeleteDo you need to stuff it with something?
ReplyDelete